


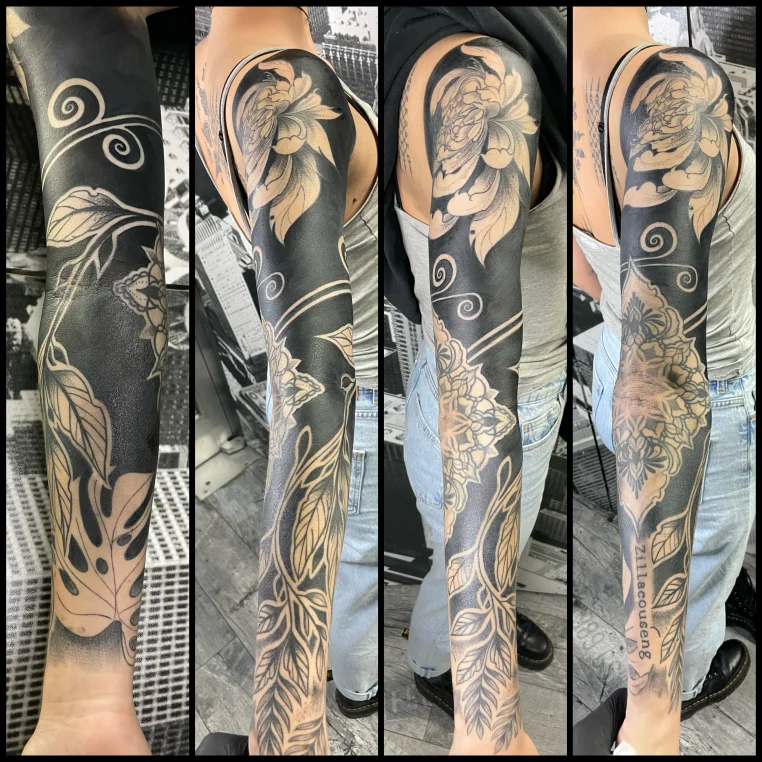
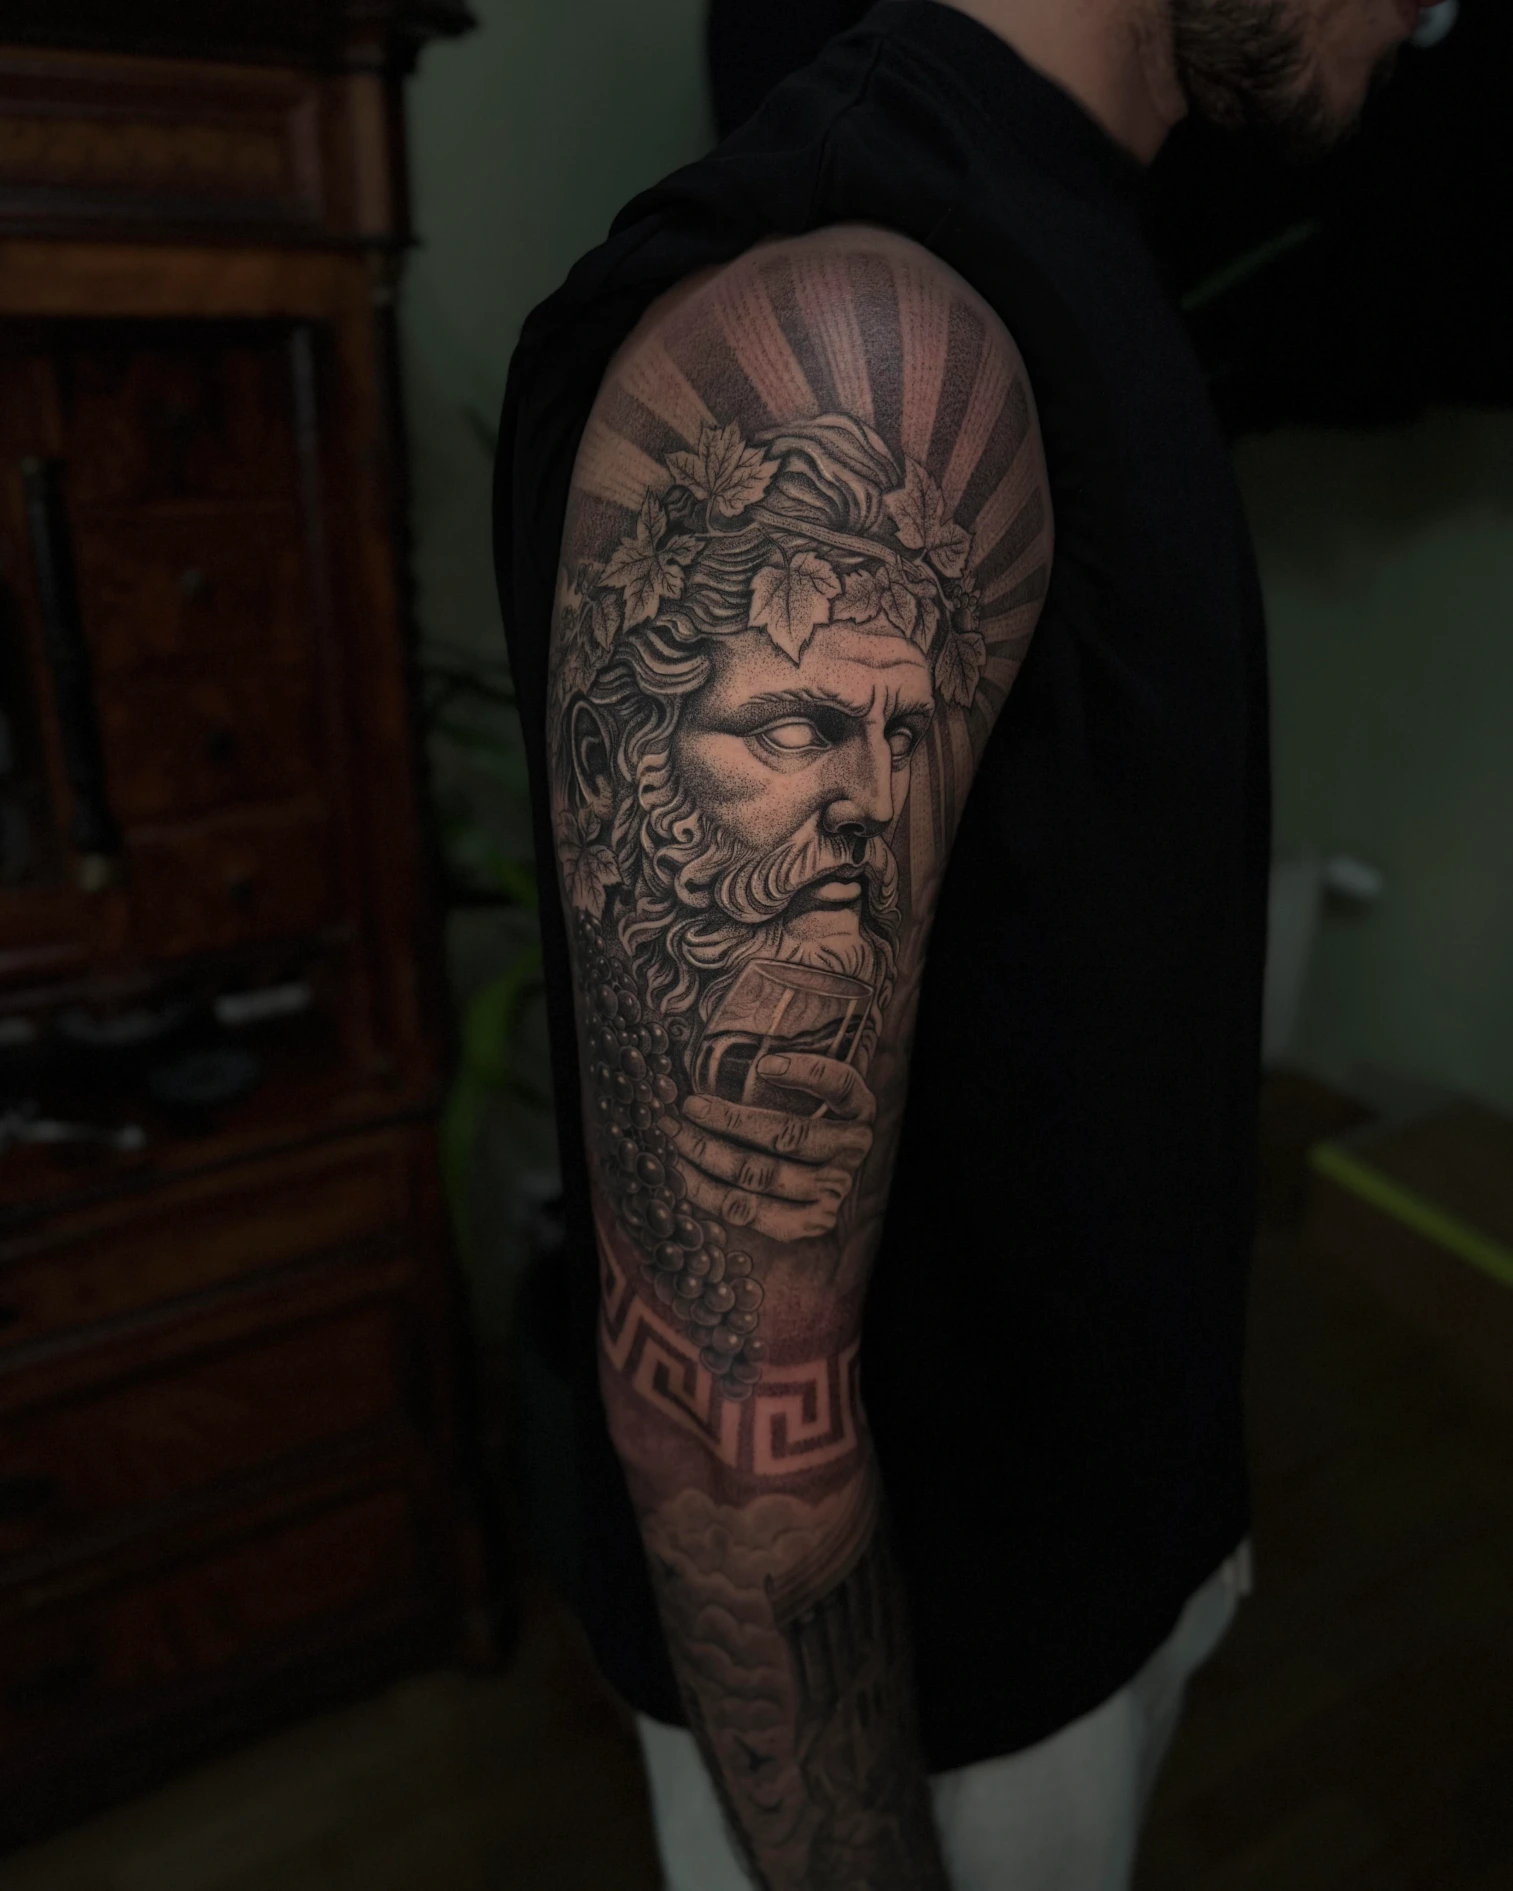
What is a sleeve, and how connected should it look?
A sleeve is a large tattoo or a collection of tattoos that wraps around an arm like a garment sleeve. A full sleeve usually runs from the shoulder to the wrist. A half sleeve generally covers the upper arm or forearm; a three-quarter sleeve often ends partway down the forearm. These terms do not replace a precise agreement on where your tattoo starts and stops.
Continuous composition or patchwork?
In a continuous composition, motifs and transitions form a connected image. A patchwork sleeve uses separate tattoos that can have visible skin between them. Both approaches can be deliberate. A patchwork arm also benefits from a balanced distribution of larger and smaller motifs.
You do not need a personal life story as a theme or a collection of symbols with fixed meanings. A shared visual language can work just as well: graphic black shapes, botanical forms or clearly separated traditional motifs, for example.
Decide on a possible endpoint early
If an upper-arm tattoo may eventually extend to the wrist, that possibility belongs in the initial plan. A broad border just above the elbow can make a deliberate endpoint, but it also determines how later work can connect. Clarify whether the shoulder, wrist and inner arm should be fully included. A sleeve does not automatically include the hand.
How a sleeve works as a composition around the arm
An arm turns, bends and can be seen from different directions. A drawing on a flat surface therefore shows only part of the eventual effect. Check the design with the arm hanging naturally, with the elbow bent, and from both the inside and outside.
Main motifs need a clear viewing angle
For a face or animal head, establish which view should show the essential details together. If the eyes, nose and mouth spread too far around the arm, the recognisable shape can disappear from the usual view. A curved plant stem, by contrast, can deliberately travel around the arm. Placement therefore depends on what the motif needs to show.
The elbow is part of the design
Skin folds together on the inside of the elbow and stretches over the outside when the arm bends. A motif can work there, but it needs to accommodate that change. With lettering, faces and precise patterns, consider which details can tolerate distortion during movement. Designing a sleeve only for a straight-arm photograph leaves an important part of its appearance unresolved.
Contrast gives the eye an order to follow
The main motif does not necessarily need the largest area. A dark shape, a light opening or a single colour accent can also attract attention first. What matters is how those visual weights are distributed. If three very dark motifs sit close together on the outside and only fine lines occupy the inside, the two sides of the sleeve can feel very different in density.
Open skin is a deliberate part of the design
Negative space means the uninked areas between or within motifs. These separate outlines and give the eye somewhere to rest. A narrow strip of skin can, for example, stop two dark shapes from merging visually. Its appropriate width cannot be determined by a universal millimetre rule.
The background, open skin and connections should therefore be planned alongside the main motifs. Clouds, leaves, patterns and shading each need a role. Adding them randomly to every gap at the end can weaken important outlines. Practical reference on integrating existing tattoos.
Plan for the healed tattoo too
A close-up of a fresh tattoo records a single moment. When choosing an artist, also ask to see healed work and views of whole arms. Look for main motifs that remain recognisable from a normal distance and a clear separation of light, middle and dark areas. Read more about tattoo colours and longevity.
Integrating existing tattoos into a sleeve
Before adding new motifs, give each existing tattoo a clear role. Should it stay unchanged, can it be reworked, or do you no longer want to recognise it? These choices affect different areas and should be made before the overall design.
- Keep it: The tattoo stays visible as an independent motif. New elements respond to its size, direction and colours.
- Rework it: The basic idea stays, while outlines or shading are adjusted where that makes sense.
- Cover it: A cover-up changes the starting conditions more substantially. Existing dark lines limit where light or open areas can go.
A shared background alone cannot automatically unite very different tattoos. Sometimes a deliberately separate arrangement is more convincing. If you want a motif to disappear, the article on cover-up tattoos in Munich explains the possibilities and limits in more detail.
Planning example: starting with an existing rose
Imagine a black rose on the outer forearm that you want to keep. Your aim is a botanical full sleeve with a bird and more flowers. This example illustrates one possible design decision; it does not describe a documented client project.
1. Account for the existing focal point
The rose’s dark leaves already attract attention. A bird of the same size immediately beside it could compete. In this example, the bird therefore gets more room on the upper arm. Its silhouette is placed so that it remains understandable from the chosen main view.
2. Develop the connection through movement
A botanical line can pick up the direction between the rose and bird. It does not have to join them with one continuous stem: recurring leaf angles and offset flowers can carry the same movement. Around the elbow, the drawing can become more open.
3. Check an additional request against the available space
If you now want a longer piece of lettering too, give it a deliberately reserved area. Shrinking it between the bird, flowers and rose simply to fit everything in would reverse the priorities. In this example, the choices would be fewer flowers, a shorter text or a different placement for the lettering.
That is the value of planning the whole composition: you can compare variations before their placement is fixed. Leaving out or moving an idea then becomes a design choice rather than a later repair.
Decide on style, colour and pattern together
A shared theme connects motifs conceptually. For them to work together visually, lines, shading, detail and colour also need to respond to one another. A delicately drawn flower and a bold graphic flower share a theme but demand different amounts of attention.
Which connections suit which approach?
Japanese-inspired compositions: Waves, wind bars and clouds can connect main motifs spatially. Their direction and the distribution of open areas belong in the overall design. If you want a traditional approach, discuss the choice and combination of motifs with an artist who specialises in it.
Geometric, ornamental and Sayagata designs: Repeated forms and a consistent grid create continuity. A flat pattern cannot simply be wrapped unchanged around a tapering forearm. Decide where it adapts, where it ends and which view serves as the alignment reference.
Black & grey or illustrative work: Related shading can connect motifs. But if almost the whole arm sits in middle grey values, separation may be lost. Deliberate shadows, light openings and quieter areas help emphasise the important shapes.
Patchwork: Each tattoo can retain its own outline. A recurring colour palette, related line widths or a balanced rhythm of smaller and larger motifs can create unity. A continuous background is not required.
Turn your ideas into a design you can discuss
You do not need a finished drawing for a useful consultation. A manageable selection of references is more helpful if you can explain what you like about them: placement, lightness, mood or a particular way of drawing lines. Other people’s tattoos serve as references for an original design.
Write down your two or three most important motifs and any elements you do not want. Add how much skin should stay visible and whether you would consider colour. If you have existing tattoos, send unedited photos of the whole arm from several directions; one close-up shows too little of the available area.
The conversation should then clarify motif sizes, viewing angles, transitions and the boundaries of the sleeve. Working methods vary: some artists use digital designs, while others refine placement directly on the body. What matters is that you understand the overall idea and the specific area to be tattooed before the work starts.
Relevant work and experience with larger compositions matter when choosing an artist. Questions about the design process, revisions and session planning help you assess how you will work together. Further reading: questions for your sleeve consultation.
Plan sessions, costs and healing realistically
A sleeve is usually completed over several appointments. The number depends on factors such as area, detail, style, skin response and working method. A fixed number without a specific design tells you little. Ask for an estimated range of hours or sessions and what could change it.
Which area gets tattooed first?
There is no fixed rule that every sleeve must start at the shoulder. The starting point may follow a main motif, an existing tattoo or the section most important to the composition. The sequence needs to suit the plan. Even when working in stages, it should be clear which spaces are reserved for later elements. Practical reference on design and session order.
Your budget covers the whole project
Clarify whether pricing is by the hour, session or an agreed project fee. Also ask how design work, deposits, changes and any necessary touch-ups are handled. A deposit may count towards the total price; the specific agreement determines this.
Alongside the price of the first appointment, ask about the expected cost range for the completed sleeve. If you want to spread the project over time, discuss sensible stopping points. A temporarily finished upper arm may be more practical than unfinished details across the entire arm. The general pricing factors are explained in How much does a tattoo cost in Munich?.
Include healing in your calendar
Arrange appointments so aftercare, work and leisure can fit together. When an area can be worked on again depends on its healing; a fixed calendar interval does not guarantee readiness. Discuss physical work, tight work clothing and exercise while planning appointments. Specific aftercare depends on the tattooed area and the dressing used.
A fresh tattoo needs protection from the sun, and swimming does not belong in the open healing phase. Sunscreen is suitable only once the skin has healed. After that, shade, clothing and broad-spectrum sunscreen with at least SPF 30 help protect against UV exposure. Source: Prevent Cancer Foundation.
Increasing redness, worsening pain, pus or fever should be assessed promptly by a medical professional. A follow-up tattoo appointment becomes secondary. Source: American Academy of Dermatology. See the tattoo aftercare guide for further information.
Frequently asked questions about planning a tattoo sleeve
Can I start with one motif and expand later?
Yes. Mention the future sleeve idea before placement if possible. The first motif can stand alone while leaving a suitable connection open. Even without a finished overall design, you can reserve the main areas and a possible endpoint.
Does the whole sleeve need to be drawn before the first appointment?
Not necessarily. A continuous image needs a workable overall structure early, while individual details can develop later. A patchwork sleeve can grow more freely. In both cases, the next motifs should fit the decisions already made.
Can several artists work on one sleeve?
Yes, especially when deliberately independent motifs are part of the concept. A continuous composition needs more coordination over transitions, colour palette and which artist works on which areas. Discuss the collaboration with everyone involved before booking.
Is one consistent style essential?
No. A contrast in style can be intentional. What matters is whether the differences work convincingly across the whole arm. Check the overall design: do individual motifs remain recognisable, or does a very dark, detailed piece overwhelm its more delicate neighbours?
Can a sleeve develop over several years?
Yes. Keep a record of the motifs and spaces you still intend to include. The current condition is assessed before every new section, since older and freshly tattooed areas may initially look different. A long-term project should also have sensible points at which to pause.
Does every gap need filler?
No. First consider what the gap contributes to the composition. If it separates two important shapes, it may be better left open. If it looks accidental and disrupts the design, an addition may help. Its shape and purpose matter more than covering as much skin as possible.
Plan your tattoo sleeve in Munich
At Tattooine Sayagata in Munich, you can discuss your idea and any existing tattoos. Flo works with Sayagata patterns, geometric forms and linework, among other approaches. For a larger arm project, it is worth considering how the motif, pattern and body shape work together.
Send photos of your arm, your main motif ideas and the intended extent of the sleeve. Explain which tattoos should remain and whether you want to work in stages.
